NixOS router software
Running all the software required for a router in NixOS.
Goals
My goal with the software side of the router is to first replace the existing usecases of my EdgeRouter, which are:
Routing
DHCP reservations
DNS
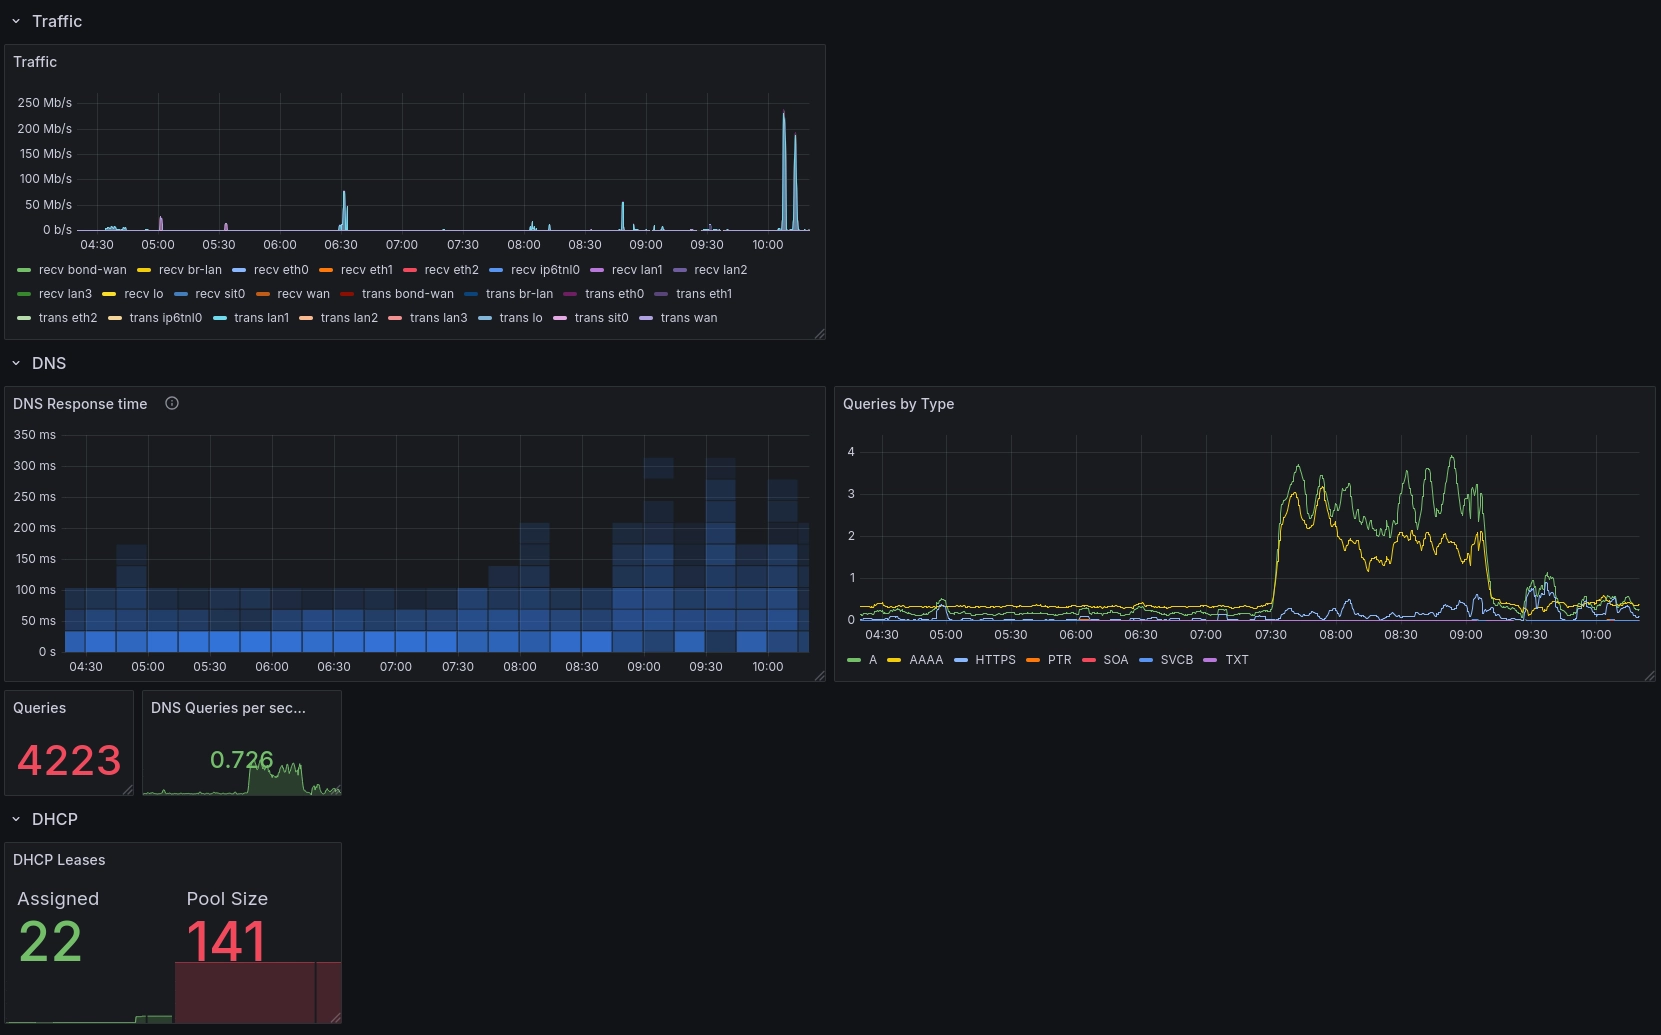
Dashboard
The EdgeRouter is a dedicated router without Wi-Fi capabilities. I have external Wi-Fi access points, and I won’t be using the Wi-Fi capabilities of the BPi-R4 right now.
Hardware specific configuration
NixOS provides two ways to manage networking hardware, networking.interfaces, and systemd.network, which uses systemd-networkd.
I prefer the systemd approach because I am already familiar with it, having used networkd to create bridges for virtual machines and wireguard networks.
The BPi-R4 has several ports:
eth03x GbE LAN ports
1x GbE WAN port
eth1SFP+ LAN porteth2SFP+ WAN port
The goal is to setup networkd to make each of these ports work for their intended purpose.
WAN ports
There are two WAN ports, one GbE, and one SFP+. Both ports can theoretically use these at the same time, but my ISP provides me with a single connection.
To manage the WAN ports I setup a bond netdev in active-backup mode.
active-backup mode keeps one port in the bond active, switching between ports when one fails.
The numerical “10-” prefix is for ordering, networkd executes lower numbers first.
{
  systemd.network.netdevs."10-bond-wan" = {
    netdevConfig = {
      Kind = "bond";
      Name = "bond-wan";
    };
    bondConfig = {
      Mode = "active-backup";
      # always swap to SFP+ if available
      PrimaryReselectPolicy = "always";
      # check link every 5s
      MIIMonitorSec = "5s";
    };
  };
}
Next, I connected the physical interfaces to the bond, with the faster SFP+ port set as PrimarySlave to take priority over the slower GbE port.
{
  systemd.network.networks = {
    "30-wan1" = {
      matchConfig.Name = "wan"; # GbE WAN
      networkConfig = {
        Bond = "bond-wan";
        ConfigureWithoutCarrier = true;
      };
    };
    "30-wan2" = {
      matchConfig.Name = "eth2"; # SFP+ WAN
      networkConfig = {
        Bond = "bond-wan";
        ConfigureWithoutCarrier = true;
        PrimarySlave = true; # SFP+ primary
      };
    };
  };
}
Finally, I created for the bond-wan device with a DHCP client to request an IPv4 from my ISP.
{
  systemd.network.networks."20-bond-wan" = {
    matchConfig.Name = "bond-wan";
    networkConfig = {
      # when any WAN port has a carrier bring up this link
      BindCarrier = ["wan" "eth2"];
      # start a DHCP Client for IPv4 Addressing/Routing
      DHCP = "ipv4";
      DNSOverTLS = true;
      DNSSEC = true;
      IPv4Forwarding = true;
      IPv6Forwarding = false;
      IPv6PrivacyExtensions = false;
    };
    # make routing on this interface a dependency for network-online.target
    linkConfig.RequiredForOnline = "routable";
  };
}
When both the GbE WAN and SFP+ connections are established, bond-wan switches from the GbE port to the SFP+ port.
[  815.507035] mtk_soc_eth 15100000.ethernet eth2: switched to inband/10gbase-r link mode
[  838.441419] mtk_soc_eth 15100000.ethernet eth2: Link is Up - 10Gbps/Full - flow control off
[  841.446113] bond-wan: (slave eth2): link status definitely up, 10000 Mbps full duplex
[  841.453965] bond-wan: (slave eth2): making interface the new active one
And when the SFP+ connection is removed bond-wan falls back to the GbE port.
[  962.893593] sfp sfp1: module removed
[  962.897333] mtk_soc_eth 15100000.ethernet eth2: Link is Down
[  967.445442] bond-wan: (slave eth2): link status definitely down, disabling slave
[  967.452862] bond-wan: (slave wan): making interface the new active one
LAN ports
The LAN ports are similar to the WAN, but instead of grouping the ports into a bond I used a bridge to act as a switch between the LAN ports.
Similar to the WAN I created the bridge netdev, br-lan, the networks for each physical port connecting them to the bridge, then the LAN bridge itself.
{
  systemd.network = {
    # create a bridge netdev
    netdevs."20-br-lan".netdevConfig = {
      Kind = "bridge";
      Name = "br-lan";
    };

    networks = let
      # the LAN ports are all configured the same with different names
      mkLan = Name: {
        matchConfig = {inherit Name;};
        networkConfig = {
          Bridge = "br-lan";
          ConfigureWithoutCarrier = true;
        };
        linkConfig.RequiredForOnline = "enslaved";
      };
    in {
      # connect LAN ports to LAN bridge
      "30-lan1" = mkLan "lan1";
      "30-lan2" = mkLan "lan2";
      "30-lan3" = mkLan "lan3";
      "30-lan4" = mkLan "eth1"; # SFP+
      # configure LAN bridge
      "10-br-lan" = {
        matchConfig.Name = "br-lan";
        bridgeConfig = {};
        address = [
          # Router private IPv4 in CIDR notation
          "172.16.0.1/24"
        ];
        networkConfig.ConfigureWithoutCarrier = true;
        linkConfig.RequiredForOnline = "no";
      };
    };
  };
}
Routing
At the core of most Linux routers is the Linux kernel packet classification framework, iptables, or the newer nftables.
I have experience with the older iptables, but nftables is recommend for all new uses, offering improved syntax, performance, and flexibility compared to iptables.
nftables is responsible for most of the heavy lifting, including:
Routing
Firewall
Port forwarding
Network address translation
I explored using a NixOS DSL for nftables, notnft, but I decided not to use it right now because it’s a complex layer of abstraction that makes it difficult to compare my configuration to examples. Instead I simply wrote nftables rules normally using the NixOS module.
Below is my basic ruleset for nftables. As an example I added two port forwarding rules:
Port 22 is open for incoming connections to the router itself
Port 443 NAT’s traffic to a webserver running on a client at
172.16.0.2.
{
  # disable local firewall
  networking.firewall.enable = false;

  networking.nftables = {
    enable = true;
    # Check errors occur because the pre-check is impure, using local hardware
    # https://discourse.nixos.org/t/nftables-could-not-process-rule-no-such-file-or-directory/33031/5?u=newam
    preCheckRuleset = ''
      sed 's/.*devices.*/devices = { lo }/g' -i ruleset.conf
      sed -i '/flags offload;/d' -i ruleset.conf
    '';
    tables = {
      "filter" = {
        family = "inet";
        content = ''
          chain input {
            type filter hook input priority 0; policy drop;

            iifname "br-lan" accept comment "Allow local network to access the router"
            iifname "bond-wan" ct state { established, related } accept comment "Allow established traffic"
            iifname "bond-wan" ip protocol tcp tcp dport 22 accept "Accept incoming SSH"
            iifname "bond-wan" ip protocol tcp tcp dport 443 accept "Accept incoming HTTPS"
            iifname "bond-wan" counter drop comment "Drop all other unsolicited traffic from WAN"
            iifname "lo" accept comment "Accept everything from loopback interface"
          }
          chain forward {
            type filter hook forward priority filter; policy drop;

            iifname "br-lan" oifname "bond-wan" accept comment "Allow trusted LAN to WAN"
            iifname "bond-wan" oifname "br-lan" ct state { established, related } accept comment "Allow established back to LAN"
            iifname "bond-wan" oifname "br-lan" ct status dnat accept comment "Allow NAT from WAN"
          }
        '';
      };
      "nat" = {
        family = "ip";
        content = ''
          chain prerouting {
            type nat hook prerouting priority -100;

            iifname "bond-wan" ip protocol tcp tcp dport 22 redirect to :22 "Redirect SSH from WAN to router"
            iifname "bond-wan" ip protocol tcp tcp dport 443 dnat to 172.16.0.2:443 "NAT HTTPs traffic from WAN to web server"
          }
          chain postrouting {
            type nat hook postrouting priority 100; policy accept;

            ip saddr 172.16.0.0/24 oifname "bond-wan" masquerade comment "masquerade private IP addresses"
          }
        '';
      };
    };
  };
}
sysctl
By default Linux ignores packets with an IP address that doesn’t match its own.
By setting net.ipv4.conf.all.forwarding Linux instead forwards the packets.
Enabling forwarding also forwards martian packets, a packet where the source or destination IP is reserved. RFC 3704 recommends filtering these to prevent IP spoofing from denial of service attacks.
{
  boot.kernel.sysctl = {
    # forward IPv4 on all interfaces
    "net.ipv4.conf.all.forwarding" = 1;
    # deny martian packets
    "net.ipv4.conf.default.rp_filter" = 1;
    "net.ipv4.conf.bond-wan.rp_filter" = 1;
    "net.ipv4.conf.br-lan.rp_filter" = 1;
    # Not using IPv6 yet
    "net.ipv6.conf.all.forwarding" = 0;
    "net.ipv6.conf.all.accept_ra" = 0;
    "net.ipv6.conf.all.autoconf" = 0;
    "net.ipv6.conf.all.use_tempaddr" = 0;
  };
}
DHCP
Dynamic host configuration protocol is the protocol clients use to request an IP address from the router.
DHCP implementation
There are two main software options for DHCP.
Dnsmasq. Although its name might suggest otherwise Dnsmasq is both a DNS server and a DHCP server.
Both are good choices, but I chose Kea because I have used Dnsmasq in the past and wanted to try something new.
{
  # DHCP server
  services.kea.dhcp4 = {
    enable = true;
    settings = {
      interfaces-config.interfaces = ["br-lan"];
      # this is a home network, a CSV file is enough to track DHCP leases
      lease-database = {
        name = "/var/lib/kea/dhcp4.leases";
        persist = true;
        type = "memfile";
      };
      renew-timer = 3600;
      rebind-timer = 3600 * 2;
      valid-lifetime = 3600 * 4;
      subnet4 = [
        {
          id = 100;
          # assign addresses in this range
          # start at .100 because I use addresses below this for reservations
          pools = [{pool = "172.16.0.100 - 172.16.0.240";}];
          subnet = "172.16.0.0/24";
          reservations = [
            {
              # DHCP server will always hand on 172.16.0.42 for a client matching
              # this MAC address
              hw-address = "A2:AA:AA:AA:AA:AA";
              ip-address = "172.16.0.42";
            }
          ];
          option-data = [
            {
              # important for clients to have a default route
              name = "routers";
              data = "172.16.0.1";
            }
            {
              # tell clients to use our DNS server
              name = "domain-name-servers";
              data = "172.16.0.1";
            }
          ];
        }
      ];
      # interface for prometheus exporter
      control-socket = {
        socket-type = "unix";
        socket-name = "/var/run/kea/kea-dhcp4.sock";
      };
    };
  };
}
DNS
Domain name system resolves a domain name to an IP address.
DNS implementation
Once again there are two great options.
I chose unbound for the same reasons I chose Kea, I have used Dnsmasq in the past and I want to try something new.
This is a simple unbound configuration that forwards DNS queries to Cloudflare’s DNS.
{
  # use unbound for local queries
  services.resolved.enable = false;

  # DNS server
  services.unbound = {
    enable = true;
    resolveLocalQueries = true;
    package = pkgs.unbound-full;
    settings = {
      server = {
        interface = [
          "172.16.0.1"
          "127.0.0.1"
        ];
        access-control = [
          "0.0.0.0/0 refuse"
          "127.0.0.0/8 allow"
          "192.168.0.0/16 allow"
          "172.16.0.0/12 allow"
          "10.0.0.0/8 allow"
          "::0/0 refuse"
          "::1 allow"
        ];
        # collect more statistics with prometheus
        extended-statistics = true;
        # allow resolving this domain to private addresses
        private-domain = "example.com";
        # local IPv4
        local-data = [
          ''"service.example.com. A 172.16.0.5"''
        ];
        local-zone = [
          ''"service.example.com." redirect''
        ];
      };
      forward-zone = [
        {
          name = ".";
          # forward queries with DNS over TLS
          forward-tls-upstream = true;
          # don't fallback to recursive DNS
          forward-first = false;
          # forward to cloudflare's DNS
          forward-addr = [
            "1.1.1.1@853#cloudflare-dns.com"
            "1.0.0.1@853#cloudflare-dns.com"
          ];
        }
      ];
      # interface for prometheus exporter
      remote-control = {
        control-enable = true;
        control-interface = "/var/run/unbound/unbound.sock";
      };
    };
  };
}
Unbound has many other features that I want to explore in the future, such as serving DNS over TLS on the local network.
Dashboard
Similar to most consumer routers the EdgeRouter 4 I am replacing has a web interface. You can configure the EdgeRouter through the WebUI, but the WebUI is most useful as a dashboard, providing quick utilization statistics on the homepage.
To create a similar dashboard to display network activity and router health I used Prometheus and Grafana.
The first step is to collect the metrics, and store them in a database, for this I used Prometheus.
Prometheus has two software components:
Exporters that run on the router
Server component containing the scraper and database running on my home server
Prometheus exporters
The exporters gather data from the kea and unbound control sockets, then serve the data over http in a machine readable format.
I try to follow a zero-trust model on my local network. To secure the Prometheus exporter, I used nginx as a TLS termination proxy, with a password for authentication, even though the exporter and server are already behind my local network.
{config, ...}: let
  fqdn = "${config.networking.hostName}.example.com";
in {
  services.prometheus.exporters.unbound = {
    enable = true;
    unbound = {
      host = "unix:///${config.services.unbound.settings.remote-control.control-interface}";
      ca = null;
      certificate = null;
      key = null;
    };
    group = "unbound";
    port = 9167;
    listenAddress = "127.0.0.1";
  };

  services.prometheus.exporters.kea = {
    enable = true;
    targets = [config.services.kea.dhcp4.settings.control-socket.socket-name];
    port = 9547;
    listenAddress = "127.0.0.1";
  };

  # general statistics such as thermals, cpu load, networking, ect.
  services.prometheus.exporters.node = {
    enable = true;
    listenAddress = "127.0.0.1";
    port = 9100;
    openFirewall = false;
    # collect address info to display public IPv4
    extraFlags = ["--collector.netdev.address-info"];
  };

  # store secrets with sops
  sops.secrets.prometheus_exporter_htpasswd.mode = "0400";

  # use nginx as a TLS termination proxy for prometheus exporters
  services.nginx = {
    enable = true;
    # 443 is used by unbound for DNS over HTTPs in the future
    defaultSSLListenPort = 4443;
    virtualHosts = let
      mkExporter = port: {
        onlySSL = true;
        # use wildcard cert
        useACMEHost = "${config.networking.hostName}.example.com";
        locations."/".proxyPass = "http://localhost:${toString port}";
        # use password to prevent unauthorized access
        basicAuthFile = config.sops.secrets.prometheus_exporter_htpasswd.path;
      };
    in {
      "kea-exporter.${config.networking.hostName}.example.com" = mkExporter config.services.prometheus.exporters.kea.port;
      "node-exporter.${config.networking.hostName}.example.com" = mkExporter config.services.prometheus.exporters.node.port;
      "unbound-exporter.${config.networking.hostName}.example.com" = mkExporter config.services.prometheus.exporters.unbound.port;
    };
  };

  # use ACME to get a wildcard certificate for this host
  security.acme.acceptTerms = true;
  security.acme.certs."${fqdn}" = {
    domain = "*.${fqdn}";
    extraDomainNames = [fqdn];
  };
  # I use DNS-01 challenge to avoid opening port 80
  # This configuration is specific to the DNS for your domain
  security.acme.defaults = { };
}
Prometheus scraper
On my home server I added the exporters as a scrape job.
{
  services.prometheus.scrapeConfigs = [
    # ...
    {
      job_name = "homerouter";
      basic_auth = {
        username = "prometheus_server";
        password_file = config.sops.secrets.prometheus_exporter_password.path;
      };
      scheme = "https";
      scrape_interval = "30s";
      static_configs = [
        {
          targets = [
            "kea-exporter.homerouter.example.com:4443"
            "node-exporter.homerouter.example.com:4443"
            "unbound-exporter.homerouter.example.com:4443"
          ];
        }
      ];
    }
    # ...
  ];
}
Grafana
Grafana makes queries to Prometheus to display the scraped data.
I took inspiration from these dashboards:
Unbound DNS resolver metrics for the response time heatmap
Node Exporter Full for the network traffic

Grafana Dashboard
I want to add the DHCP lease table to Grafana in the future.
The kea control socket exposes lease information, but the scraper doesn’t gather it.
For now it’s easy enough to SSH into the BPi and inspect the CSV lease file at /var/lib/kea/dhcp4.leases.
Testing
Running BPi-R4 hasn’t been entirely smooth.
When I started this project the kernel module responsible for networking, mtk_eth, often failed to load on boot.
Other people have also reported issues, such as the Ethernet failing under heavy load.
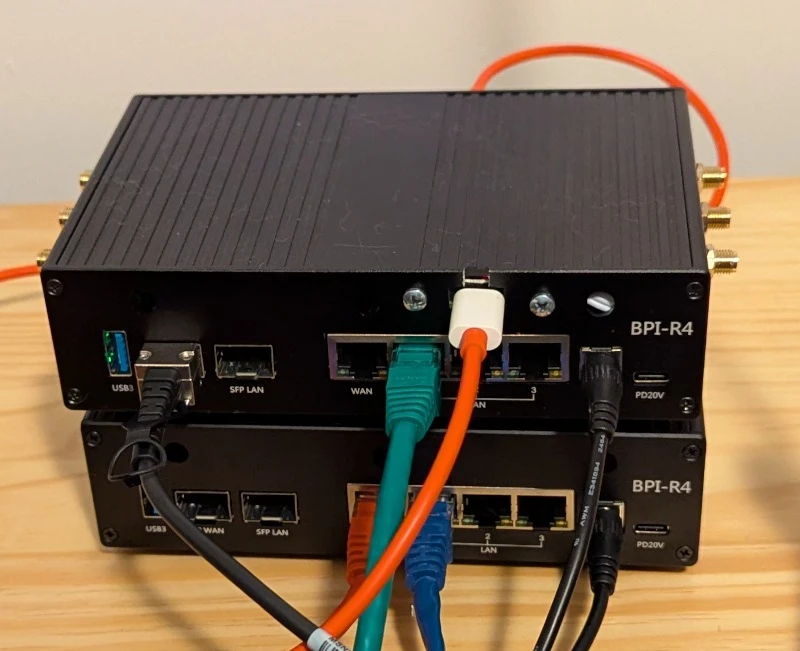
I decided to purchase a second BPi-R4 to investigate issues as they occur without disturbing my home internet.

Testing (top) and production (bottom) BPi-R4s
Boot reliability
To test boot reliability I created a python test harness to check for a successful SSH connection after applying AC power.
Source on GitHub: newAM/bpi-r4-tst
Previously mtk_eth would fail to load >50% of the time, but after 10 bootups mtk_eth was still working.
I suspect a kernel update fixed the underlying issue.
Load testing
I connected the BPi WAN to my home server with 10 Gbps SFP+, and connected a spare raspberry pi on the WAN side as a client.
I used iperf3 between the raspberry pi and my home server to put the router under load. This isn’t a perfect test because there’s only a single client, in reality there are dozens of clients on my network. After several hours under load everything was working fine at 1 Gbps.
I re-ran iperf3 using the 10 Gbps SFP+ connection to increase the throughput. I didn’t have an SFP+ capable client available, so this was just between my home server and the BPi.
[ ID] Interval           Transfer     Bitrate         Retr  Cwnd
[  5]   0.00-1.00   sec   544 MBytes  4.56 Gbits/sec   56   1.47 MBytes
[  5]   1.00-2.00   sec   553 MBytes  4.64 Gbits/sec    9   1.28 MBytes
[  5]   2.00-3.00   sec   550 MBytes  4.62 Gbits/sec    0   1.56 MBytes
[  5]   3.00-4.00   sec   547 MBytes  4.59 Gbits/sec    9   1.37 MBytes
[  5]   4.00-5.00   sec   551 MBytes  4.62 Gbits/sec   13   1.17 MBytes
[  5]   5.00-6.00   sec   546 MBytes  4.58 Gbits/sec    0   1.47 MBytes
[  5]   6.00-7.00   sec   550 MBytes  4.61 Gbits/sec    4   1.28 MBytes
[  5]   7.00-8.00   sec   548 MBytes  4.59 Gbits/sec    0   1.56 MBytes
[  5]   8.00-9.00   sec   548 MBytes  4.60 Gbits/sec   15   1.37 MBytes
[  5]   9.00-10.01  sec   552 MBytes  4.58 Gbits/sec   17   1.17 MBytes
- - - - - - - - - - - - - - - - - - - - - - - - -
[ ID] Interval           Transfer     Bitrate         Retr
[  5]   0.00-10.01  sec  5.36 GBytes  4.60 Gbits/sec  123             sender
[  5]   0.00-10.01  sec  5.36 GBytes  4.60 Gbits/sec                  receiver
The BPi-R4 can only run at 4.6 Gbits/sec, in theory it can run at 10 Gbits/s with SFP+. This is good enough for now, but worth investigating in the future.
Performance
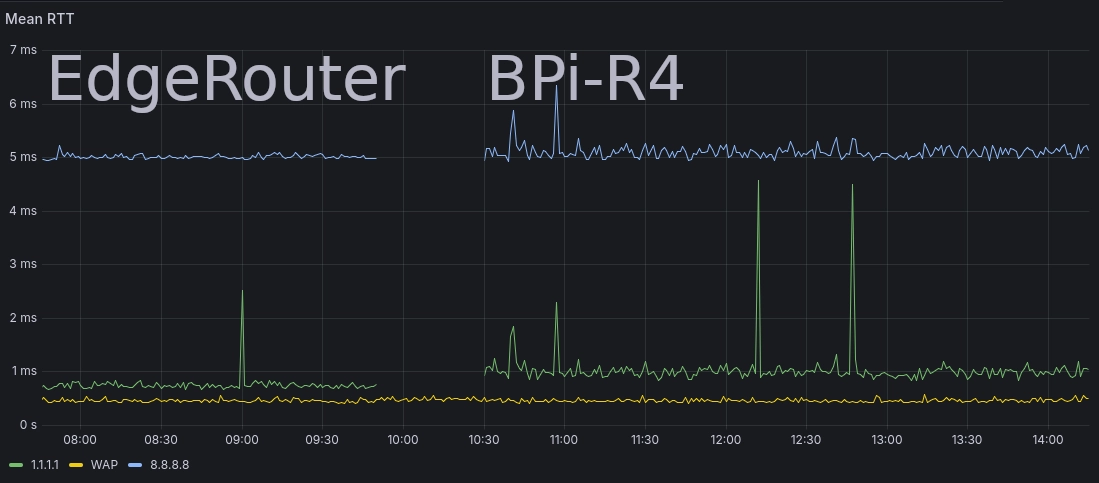
After deploying the BPi-R4 I saw some disappointing, but not unexpected latency regressions from my EdgeRouter. Notably the latency to Cloudflare’s DNS increased from ~750 µs to ~1 ms.
This wasn’t entirely unexpected because I have largely ignored hardware acceleration and performance in general.

Latency before and after switching to the BPi-R4
I was running load testing after deploying the BPi-R4, which caused the large latency spikes seen on the BPi-R4 side.
Future work
This project is far from over, there are more enhancements that I want to make in the future.
IPv6
Wi-Fi 7
Local DNS over TLS, HTTPS, QUIC
Monitoring enhancements
Per-client network utilization
Add DHCP lease information to kea scraper
Add DHCP lease table in Grafana
Performance
Hardware acceleration in
nftablesAchieving full 10 Gbps speeds